

Quick Setup Guide
How to install overlays, alerts, badges, and more in OBS Studio, Streamlabs Desktop, and StreamElements. Follow these simple steps to get your stream package running in minutes.
01
IMPORT THE SCENE COLLECTION
Streamlabs Desktop (Auto-Import)
- Launch Streamlabs Desktop. Navigate to Settings → Scene Collections.
- Click Import Overlay File.
- Locate and double-click the
.overlayfile from your downloaded folder. - Your scenes are now fully loaded.
OBS Studio (Scene Collection Import)
- Launch OBS Studio.
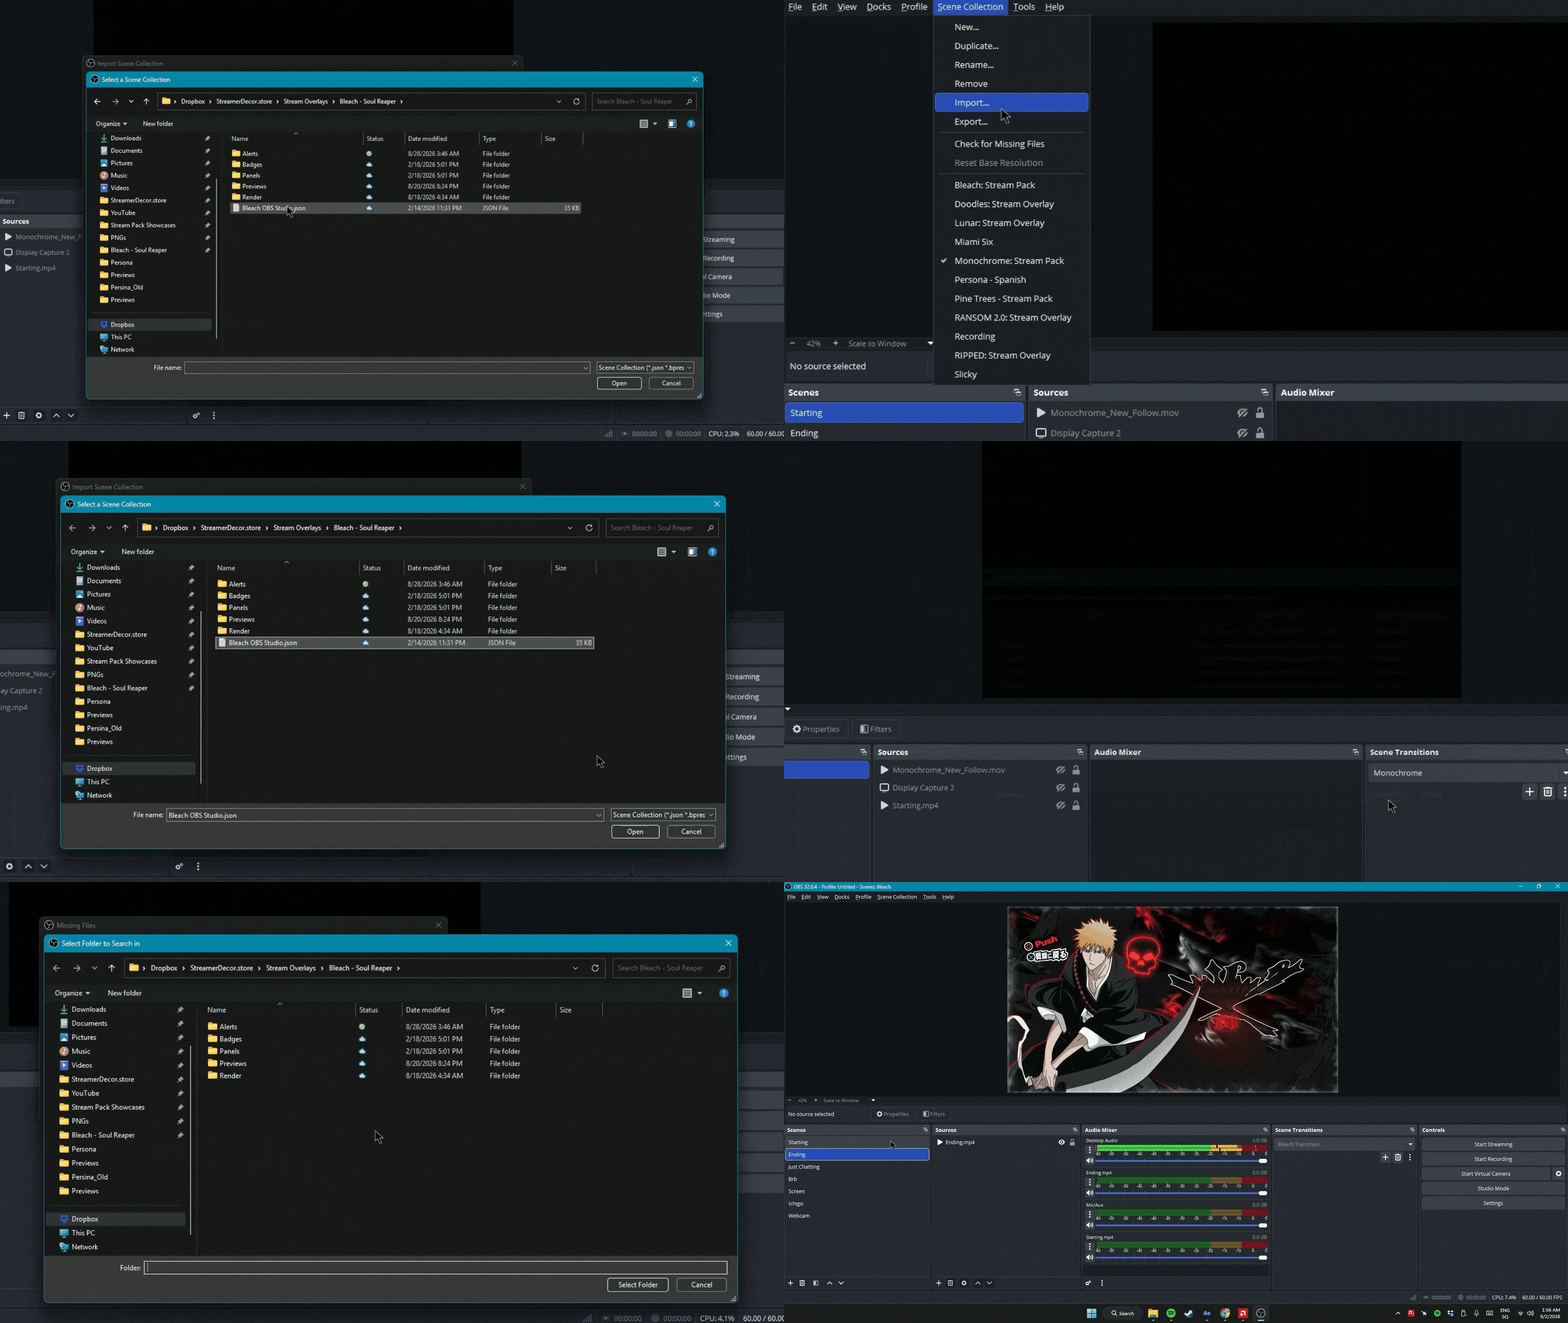
- In the top menu bar, click Scene Collection → Import.
- Click Add (or the three dots) and navigate to your extracted download folder.
- Select the
.jsonfile provided in the pack and click Import. - Go back to Scene Collection in the top menu and select your newly imported overlay from the dropdown list.
- If OBS gives you a Missing Files warning, click Search Directory, select the main extracted folder, and OBS will relink missing assets.
Manual Import (For Individual Assets)
- If you prefer to build scenes from scratch, you can add assets manually.
- In OBS, click the + button under Sources and choose Media Source.
- Check the Loop box so the animation plays continuously.
- Browse for your file, click OK, and resize it on your canvas.
02
IMPORT THE ALERTS
Adding Stream Alerts (StreamElements)
- Log in to your StreamElements account.
- Open the Alerts folder inside your downloaded
.zip. - Double-click the provided StreamElements .URL quick-install link.
- This creates a new overlay in Streaming Tools → My Overlays.
- Click Copy URL next to the new alert overlay to prepare it for OBS.
Adding Stream Alerts (Streamlabs)
- Log in to your Streamlabs account.
- Open the Alerts folder in your downloaded
.zip. - Double-click the Streamlabs .URL quick-install link.
- This imports the custom alert theme to your dashboard.
- Copy your alert Widget URL.
Adding the Chat Widget (Streamlabs)
- Log in to your Streamlabs account.
- Open the Chat Widget folder in the downloaded
.zip. - Double-click the
.URLlink to import preconfigured chat settings. - Copy the widget URL and add it to OBS as a Browser Source.
03
CUSTOMIZE YOUR SETUP
Changing the Color Theme
- Right-click the overlay layer in your OBS Sources panel.
- Select Filters.
- Click + under Effect Filters and select Color Correction.
- Adjust the Hue Shift slider until you like the result.
Stinger Transitions
- Your stinger transitions are already configured if you used the auto-install files. No extra setup required.
- If you run into bugs or need help, visit the contact page.
04
TWITCH PANELS & WEBCAM
Adding Twitch Profile Panels
- Go to your Twitch channel and click the About tab.
- Toggle Edit Panels to ON.
- Click the + box and choose Add a Text or Image Panel.
- Click Add Image and choose a panel PNG (About, Schedule, Discord, Donate) from the pack.
- Optionally add a destination under Image Links To.
- Click Submit, then switch Edit Panels off.
Fitting Your Webcam Overlay
- In OBS Studio or Streamlabs Desktop, open Sources.
- Click + → Video Capture Device and select your camera.
- Add a Media Source (animated overlay) or an Image (static overlay) and select the webcam frame.
- Layer order: Place the webcam overlay above the camera in the Sources list.
- Crop: Hold ALT while dragging the red edges of your camera source to fit the frame.
- Group: Hold CTRL, select both sources, right-click and choose Group Selected Items.
05
CHROMA KEY & SUB BADGES
Removing Green Screen (Chroma Key)
- Right-click your camera or video source in the OBS Sources panel.
- Select Filters.
- Click + under Effect Filters and choose Chroma Key.
- Set Key Color Type to Green.
- Adjust Similarity until the green background disappears without clipping your subject.
Uploading Twitch Sub Badges
- Open your Twitch Creator Dashboard.
- From the sidebar, select Monetization → Subscriptions.
- Find Subscriber Badges.
- Choose a badge milestone such as Base, 2-Month, or 3-Month.
- Auto-Resize: Leave it ON and upload the largest badge file (usually
72×72). - Manual Upload: Turn Auto-Resize OFF and upload
18×18,36×36, and72×72files. - Click Upload or Save Changes.
Need help?
If you run into any issues, bugs, or questions, get in touch. Or explore more packs to upgrade your stream setup.